Sometimes you want vintage vibes, but the ease of modern tech. As a classic analog camera with instant print photos that can also pull off advanced creative tricks while connected to an app, Polaroid’s new Now+ is the best of both worlds — even if Polaroid has already released most of its features before.
The Now+ made me feel like the artistic director of a 90s shoot and a spontaneous VSCO girl enjoying an afternoon in the park at the same time. The artistic inspiration came from the creative capabilities of the Bluetooth-paired app, while the carefree teenage dream came courtesy of the simple pleasure of an instant photo. There’s really nothing that beats holding a photo you just took seconds ago in your hand, and the Now+ lets you take that photo in tons of new ways.
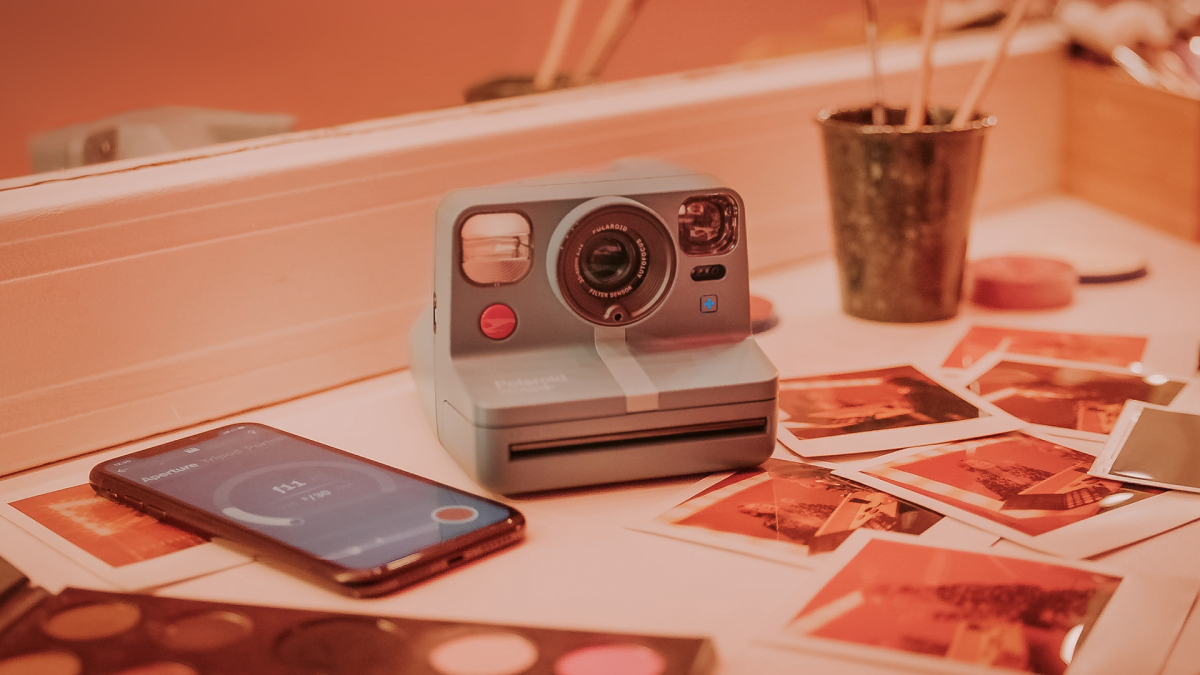
The camera itself

The Now+, in blue-gray.
Credit: mashable/jennimai nguyen
The Now+ is the upgraded version of the Polaroid OneStep+. This latest version comes with some of the creative app modes from the OneStep+, and adds two new modes and physical lens filters. Ultimately, the Now+ is not hugely different from the OneStep+, but the price jump isn’t so astronomical that the extra goodies aren’t worth it. It comes in white, black, and blue-gray, which is an admittedly limited color range.
The physical design of the Now+ is identical to the Polaroid Now, and I found myself both enjoying the classic look and wishing for slight adjustments. It features the typical photo printing slot, a button to control flash, a screen to display the amount of film you have left, a button to capture your photo, and the tripod mount on the bottom. The camera packs two lenses that automatically switch depending on subject matter: portrait or standard. Inside the box, you also get a USB charging cord and a neck strap.
I really appreciated the screen telling me how many photos I had left to take. It can feel like a dangerous guessing game when you take an instant camera to a shoot location or on a trip, assuming it has a full film cartridge inside – only to get there and realize you have no film left at all. Turning on the camera activates the screen, so it was a quick way to get my bearings and decide if I needed more film.

When a photo prints, the black film unfurls from the camera to keep it covered and protected from harsh light.
Credit: mashable/jennimai nguyen
The buttons function as you would expect them to, and the printing slot worked perfectly. When you take a photo, it prints with an automatic screen that unrolls on top of your picture. This protects your photo from harsh light that may affect how it develops, and is super handy when you’re taking pics outdoors. The new tripod mount is compatible with classic, screw-on tripods of any height, so you can use it with any you may already have. Polaroid doesn’t offer tripods at this time.
My only gripe with the overall design is with the size and shape. Don’t get me wrong – I do like the look of it. It’s classic and sleek, but I happen to have pretty small hands. With the size, shape, and location of the buttons, I found it a little difficult to hold the camera and easily maneuver it between my fingers. I will say that this problem is largely solved by placing the camera on a tripod via the tripod mount – an extremely handy addition, but not always practical if you want to literally be able to point and shoot. The remote modes on the app also help avoid the issue of fumbling with the capture button’s awkward placement, but again, that does take away from the novelty of the camera itself.
The accessories
However, the novelty is slightly restored with the included physical filters. The camera comes with five filters: red vignette, blue, yellow, orange, and starburst, plus a protective lens cap for the camera when there’s no filter in use.

The included lens filters are really easy to attach.
Credit: mashable/jennimai nguyen
The filters snap over the camera’s lens super easily, so putting them to good just takes creativity. The colored lenses apply an even tint to the photo and are the easiest to work with. The red vignette applies a red tint that is more intense around the edges, and the starburst filter turns light sources into starburst shapes. The latter is the most complicated to figure out, but still not difficult – it just requires being mindful of your light sources, and learning how to work with the camera in darker settings.

Taken using the yellow filter.
Credit: Mashable/Jennimai nguyen

Taken using the starburst filter.
Credit: Mashable/jennimai nguyen
In terms of film, the Now+ works with Polaroid’s Color i-Type or B&W i-Type film, which costs $15.99 per pack of eight shots. While the film develops nicely enough, it is a little painful to remember each instant photo costs about $2 a pop. It leaves much less room to experiment with the creative modes if you’re trying not to waste film or are on a budget, which is such a shame when some of the modes are so impressive but may require a bit of practice.
Using the app and each creative mode
Now here’s where all the magic happens. Polaroid launched its app abilities with the OneStep+ camera, but the Now+ allows for the additions of Aperture and Tripod modes. It also has Remote, Self-Timer, Light Painting, Double Exposure, Portrait, and Manual modes, which all also worked with its predecessor.

This is what the Polaroid app looks like in the App Store.
Credit: Screenshot: apple

The app interface, with the camera paired.
Credit: Screenshot: polaroid
Pairing the app and camera was as simple as it gets. All I had to do was turn the camera on, make sure my Bluetooth was on, and launch the app. The first time I did this, the camera paired pretty instantly – it was much faster pairing than I’ve experienced with gadgets like Bluetooth speakers or headphones, and I was honestly wowed.
Every time I’ve used it since the initial pairing, the app has found the camera without any issues. But in case there are issues, the app interface includes a function that relocates your device. And if you happen to have multiple cameras for whatever reason, the app can distinguish between each one.

A photo taken using Remote mode. It was much harder to keep my phone out of frame when using it as a remote!
Credit: Mashable/jennimai nguyen
Using the creative modes varied in difficulty, but the app also has a brief explanation for each one. Some were pretty self-explanatory, like Remote and Self-Timer. While these two modes are pretty similar, I appreciated having both. Remote let me set up my shot to my liking and immediately take the shot without having to wait for a timer, while Self-Timer lets you set up selfies and put your phone down before the shutter clicks.
Portrait mode was also familiar, but the Now+’s version uses the paired camera and app to tell you the optimal distance you should be from your subject. The app displays a “too far,” “too close” or “perfect” message as you adjust your distance.

The background of my Portrait mode photo is blurred nicely, but the subject doesn’t seem so crisp.
Credit: mashable/jennimai nguyen
This is super helpful in theory, but in practice, I found the messages to be pretty temperamental. I would move about an inch, and it would flash between “too far” and “perfect,” and it would be hard for me to find that perfect spot and take the photo immediately. My photo subject was stuck smiling at the camera for quite a while as I fidgeted with it, and even when i thought I found the optimal spot, the photo didn’t come out quite as crisp as I’d have liked.
This is where the new Aperture mode is an improvement. The mode lets you set the camera’s f-stop anywhere from f-11 to f-64, letting in more or less light as the situation depends on it. Lower f-stops gave photos a blurrier background, while higher f-stops pulled more of the photo into focus. The ability to change this lets you customize the bokeh effect in a shot like a portrait, and its up to you how crisp it turns out. The mode does limit how high of an f-stop you can set, depending on the light the camera is sensing.

Aperture mode on the app.
Credit: Screenshot: polaroid

Tripod mode on the app.
Credit: Screenshot: polaroid
Tripod mode, the other newbie, has a slightly misleading name. Yes, it’s recommended that you attach the camera to a tripod while using this mode, but you can also use a tripod with any of the other modes. This mode primarily holds the shutter open longer, aimed to be used in low light scenes at night and to help capture cool light effects, like blurred headlights or lasers.
While it can create visually stunning effects in dark situations, this seems accomplishable with Aperture mode, too. Tripod mode essentially takes one of Aperture mode’s abilities, and makes it a preset. It’s useful if you’re trying to access the effect quickly and don’t want to waste film by testing the correct aperture in low light.
Light Painting and Double Exposure are the most abstract modes, and consequently, the most fun to play with. I attempted to use Light Painting in daylight, and let me tell you: that simply does not work. Trying to draw with light must be done at night or in a sufficiently dark room. The shutter is held open and lets in too much light in the daytime, leading to an overexposed photo. But the app’s interface builds in a button to turn on your phone’s flashlight to use as the light source, which makes the whole process very accessible. No sparklers or physical lights needed, but you could use those too!

Double Exposure, double pose!
Credit: Mashable/Jennimai nguyen
Double Exposure takes two photos and interlays them in one print, which allows for really beautiful or just goofy shots. I went with goofy, and posed my subject in a back-to-back position with himself. But you could also take a photo of something like flowers and a closeup of someone’s face, creating a floral pattern over the skin. All you have to do is hit the shutter button on the app twice as each photo is ready to be taken, and the camera does the rest of the work for you.
Of course, Manual mode lets you personalize tons of separate components. Photographers can adjust aperture, shutter speed, flash strength, and exposure levels. The mode also lets you switch between the camera’s portrait and standard lenses, and you can decide when to eject the film. In theory, you could overlay multiple exposures in one photo before ejecting.

The photo scanner will tell you to adjust as necessary.
Credit: screenshot: polaroid

Once it scans, you can save it to your camera roll from here.
Credit: Screenshot: polaroid
And to top it all off, the app also has a photo scanner. Once you’ve taken your physical prints, you can digitize them for the ‘gram or to send to others by scanning them in the app, which saves automatically to your camera roll. The scanner is handy for removing the background that the physical photo is laying against – but of course, if you want to capture a hand holding the photo, you can always take a regular shot for the vibes.
SEE ALSO: How to learn photoshop
But is all of this really that new?
The Polaroid Now+ certainly isn’t one of a kind. While Polaroid is the OG brand in instant photography, several others have produced instant print cameras over the years, at various price points and with unique features. But while there are others out there, the Now+ is one of the most versatile – it lets both beginners and seasoned photographers explore their creative sides with its easy-to-use modes, which fosters experimentation. No other brand seems to have as many modes to play with. As I mentioned though, this creativity does come at a pretty high cost, what with the camera itself and the necessary film. But if you’re willing to pay the price, the Now+ really lets you push the boundaries of analog photography.
The Polaroid OneStep+ ($139.99) is the Now+’s most serious competition. With most of the modes that come with the Now+ at a slightly smaller price, it’s a very comparable experience. However, the additions of the Tripod mode, Aperture mode, and lens filters do add a considerable usage factor, so the more serious photographer might find the Now+ more worth the slight upcharge.
But like I said, there are plenty of fish in the sea. Other instant cameras may offer more budget-friendly options, or can pair with smartphones to also print any pictures you may have in your camera roll. To start exploring those, check out: